2023年4月10日 星期一

ComfyUI 安裝筆記

 https://github.com/comfyanonymous/ComfyUI 主程式

https://github.com/Fannovel16/comfy_controlnet_preprocessors Controlnet支援


安裝

git clone https://github.com/comfyanonymous/ComfyUI


cd ComfyUI\ -> pipenv --python 3.10

pipenv shell

pip install torch torchvision torchaudio --extra-index-url https://download.pytorch.org/whl/cu118 xformers


cd ComfyUI/custom_nodes

git clone https://github.com/Fannovel16/comfy_controlnet_preprocessors

cd comfy_controlnet_preprocessors

python install.py --no_download_ckpts


放入各式模型位置

ComfyUI\models\checkpoints\

ComfyUI\models\loras\

ComfyUI\models\controlnet\


啟動

cd ComfyUI 

python main.py
2023年4月8日 星期六

sublime text 簡體中文檔案

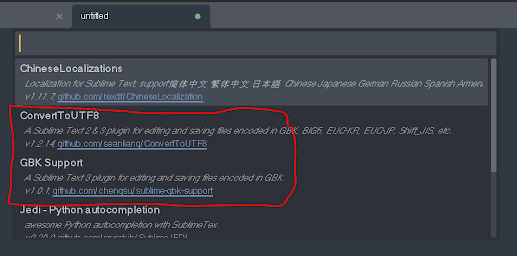
使用package control安裝下面兩個套件

可避免簡體中文內容的檔案出現亂碼的情形。
ctrl+shift+p 開啟 package control 選擇 install package 安裝:


2023年4月6日 星期四

webui.bat 不爆顯存的設定

 4.在webui-user.bat加入下面的參數

set COMMANDLINE_ARGS=---medvram -precision full --no-half --skip-torch-cuda-test   #AMD

set COMMANDLINE_ARGS=--xformers --medvram --precision full --no-half               #NVIDIA 低階卡

set COMMANDLINE_ARGS=--xformers                                                    #NVIDIA 高階卡

如果 cuda 持續 out of memory 也可以試試加入 --opt-split-attention 或加入下面一行

set PYTORCH_CUDA_ALLOC_CONF=garbage_collection_threshold:0.6,max_split_size_mb:256 <-數字越小越安全

如果要使用ControlNet要移除 --medvram 不然會有錯誤如下:

Expected all tensors to be on the same device, but found at least two devices

目前設定:

set COMMANDLINE_ARGS=--xformers --opt-split-attention

set PYTORCH_CUDA_ALLOC_CONF=garbage_collection_threshold:0.6,max_split_size_mb:128

stable diffusion webui 必裝插件收集

 sd_web_ui_preset_utils #主要採樣配置設定儲存與讀取

controlnet 系列

    sd-webui-controlnet    #角色動作骨架主要插件

    openpose-editor        #在webui上設計骨架

    posex                  #3D設計骨架

    sd-webui-depth-lib     #手部造型depth庫

stable-diffusion-webui-localization-zh_TW    #中文化

sd-webui-bilingual-localization              #可同時顯示原文與中文化

a1111-sd-webui-tagcomplete                   #prompt自動補全

Stable-Diffusion-Webui-Civitai-Helper        #C站助手

multidiffusion-upscaler-for-automatic1111    #切片繪製大圖

stable-diffusion-webui-two-shot              #分區規劃構圖

stable-diffusion-webui-composable-lora       #使用AND分開lora互相污染

stable-diffusion-webui-rembg                 #AI去背摳圖

2023年3月15日 星期三

stable-diffusion 用 amd 卡太慢了

 
出一張圖要20分以上
還是放棄吧,下單買nvidia的卡了(笑死)


2023年3月14日 星期二

stable-diffusion 本機安裝筆記 - 適用 amd 顯卡

安裝

1.先安裝好 python 3.10.6 以上,git


2.git clone https://github.com/AUTOMATIC1111/stable-diffusion-webui


3.cd stable-diffusion-webui 設置好 pipenv 虛擬環境為 3.10.6 以上,pipenv shell 開啟虛擬環境


4.在webui-user.bat加入下面的參數

set COMMANDLINE_ARGS=--precision full --no-half --skip-torch-cuda-test


5.在 pipenv shell下執行 webui-user.bat


6.開啟 http://127.0.0.1:7860


7.在網頁上安裝中文化擴展 https://github.com/VinsonLaro/stable-diffusion-webui-chinese

擴展插件頁面的Install form url 再回到Installed頁面reload重啟


8.安裝 https://github.com/Mikubill/sd-webui-controlnet.git 擴展 重啟


9.下載 https://huggingface.co/lllyasviel/ControlNet/tree/main/models 下的

control_sd15_openpose.pth 模型,放到 ./stable-diffusion-webui/extensions/sd-webui-controlnet/models裡


10.下載已訓練好的模型,https://civitai.com/api/download/models/6266 放到 .\stable-diffusion-webui\models\Stable-diffusion

civitai.com上有許多不同風格的模型


11.最後再重啟一次即可